Welcome to ZK Electronic
16 years of industry experience
Good material qualty, high efficiency, fast delivery
搜索
NEWS
Routine spot check and maintenance of Yamaha SMT feeder
- Categories:Industry News
- Author:Becky Su
- Origin:
- Time of issue:2022-11-30 11:08
- Views:
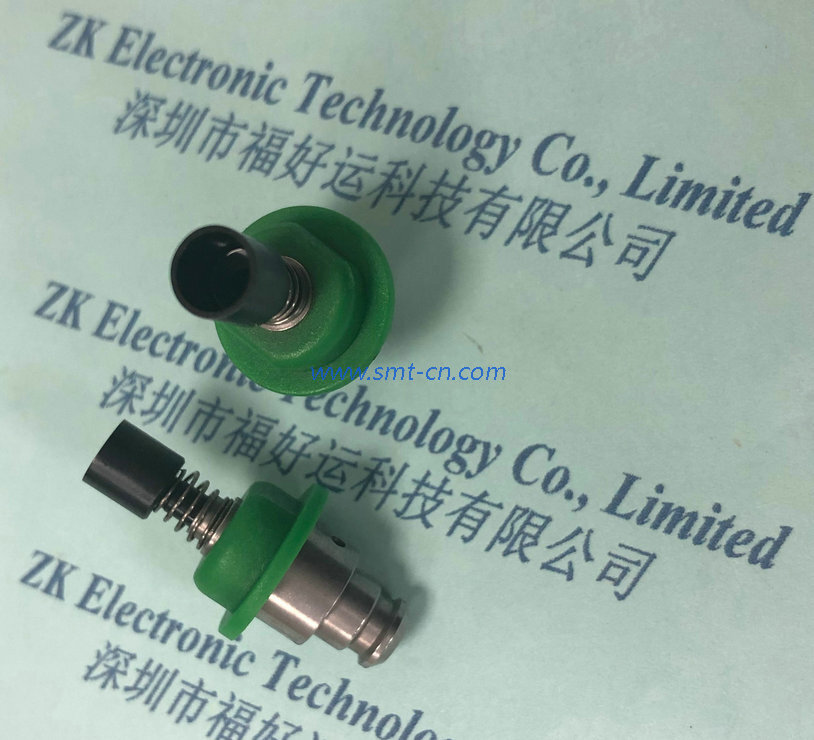
(Summary description)Routine spot check and maintenance of Yamaha SMT feeder Purpose: In order to use the belt feeder for a long time, it must be checked and maintained regularly. 1 Daily spot check Before using the belt feeder, please check the following items. Routine Check Items: Symptom Countermeasure Whether the fixing rod is loose Please refer to the maintenance manual Whether the material belt guide rail is loose Refer to Cleaning of Material Belt Guideway Whether the screws are loose Please tighten the screws Whether there are deformed and damaged elements Repair, replace Whether any components are missing Repair, replace 2 Cleaning of belt guide rail If garbage such as electronic components falls into the gap between the material belt guide rail and the plate, it will cause the material belt guide rail to become loose, the element conveying port will be deformed, and the element adsorption position will shift. In case of similar phenomenon, please follow the following steps to clean. Step 1 Remove the strip guide rail. Please loosen the screw fixing the upper belt guide rail shaft and remove the belt guide rail and guide rail shaft. Please use a screwdriver to turn the material belt guide rail shaft to facilitate disassembly. Remove the tape guide rail (Fig.) Step 2. Please use a brush to clean up the garbage between the material belt guide rail and the plate. Cleaning material tape guide rail (Fig.) Step 3 Confirm the operation status of the component transmission port. Confirm whether the component transmission port is operating correctly. In case of being clamped or sluggish, please replace the new belt guide rail in time. Confirm operation status (Fig.) Step 4 Install the loading belt guide rail. Install the strip guide rail and guide shaft on the plate in reverse order. Please turn the guide rail shaft 180 degrees anticlockwise with a slotted screwdriver Stretch. Keep this state and tighten the fixing screws of the strip guide rail shaft. Then, please confirm that there is no gap between the strip guide rail and the plate. Install the loading tape guide rail (Fig.) Yamaha bonder feeder routine inspection and maintenance is introduced. This article is a Yamaha bonder feeder CL model 8x4mm feeder to do the example, need Yamaha bonder feeder friends can contact me:. Yamaha chip machine pneumatic feeder,yamaha cl model feeder Yamaha chip machine YV100 series YG series pneumatic feeder YAMAHA 8MM FEEDER Yamaha chip machine YV100 series YG series pneumatic feeder YAMAHA 12MM FEEDER Yamaha Bonder YV100 Series YG Series Pneumatic Fiducial YAMAHA 16MM FEEDER Yamaha Bonder YV100 Series YG Series Pneumatic Fiducial YAMAHA 24MM FEEDER Yamaha Chip Machine YV100 Series YG Series Pneumatic Fiducial YAMAHA 32MM FEEDER Yamaha Chip Machine YV100 Series YG Series Pneumatic Fiducial YAMAHA 44MM FEEDER Yamaha YV100 series YG series pneumatic flyer YAMAHA 56MM FEEDER Yamaha CL model 8*2mm pneumatic flyer, applicable models: YAMAHA YVL88II YV100II YVL112-2; YV88X YV88XG YV100X YV100Xe YV100Xg YV100XP YG100A YG100B YG200 YG300 models; Yamaha CL model 8*4mm pneumatic flyer for YAMAHA YVL88II YV100II YVL112-2; YV88X YV88XG YV100X YV100Xe YV100Xg YV100XP YG100A YG100B YG200 YG300 models; Yamaha CL model 12mm pneumatic flyer for YAMAHA YVL88II YV100II YVL112-2; YV88X YV88XG YV100X YV100Xe YV100Xg YV100XP YG100A YG100B YG200 YG300 models; YAMAHA CL model 16mm pneumatic flyer for YAMAHA YAMAHA CL model 24mm pneumatic flyer for YAMAHA YAMAHA CL Model 32mm Pneumatic Fiducial, for YAMAHA YAMAHA CL model 44mm pneumatic flybar, applicable models: YAMAHA YAMAHA CL model 56mm pneumatic flyer, applicable models: YAMAHA Translated with www.DeepL.com/Translator (free version)
Routine spot check and maintenance of Yamaha SMT feeder
(Summary description)Routine spot check and maintenance of Yamaha SMT feeder
Purpose: In order to use the belt feeder for a long time, it must be checked and maintained regularly.
1 Daily spot check
Before using the belt feeder, please check the following items.
Routine Check Items:
Symptom
Countermeasure
Whether the fixing rod is loose
Please refer to the maintenance manual
Whether the material belt guide rail is loose
Refer to Cleaning of Material Belt Guideway
Whether the screws are loose
Please tighten the screws
Whether there are deformed and damaged elements
Repair, replace
Whether any components are missing
Repair, replace
2 Cleaning of belt guide rail
If garbage such as electronic components falls into the gap between the material belt guide rail and the plate, it will cause the material belt guide rail to become loose, the element conveying port will be deformed, and the element adsorption position will shift. In case of similar phenomenon, please follow the following steps to clean.
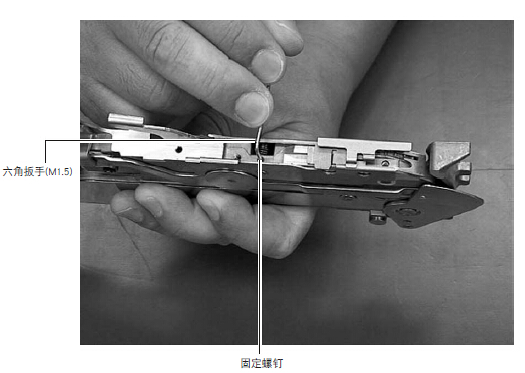
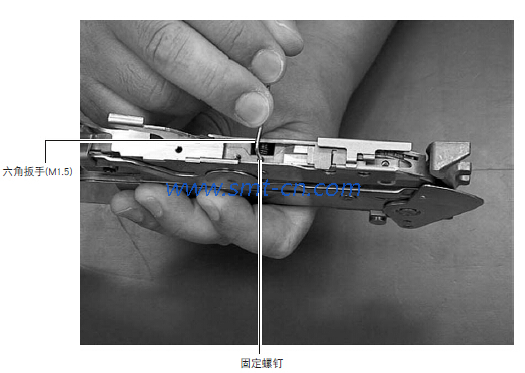
Step 1 Remove the strip guide rail.
Please loosen the screw fixing the upper belt guide rail shaft and remove the belt guide rail and guide rail shaft. Please use a screwdriver to turn the material belt guide rail shaft to facilitate disassembly.
Remove the tape guide rail (Fig.)
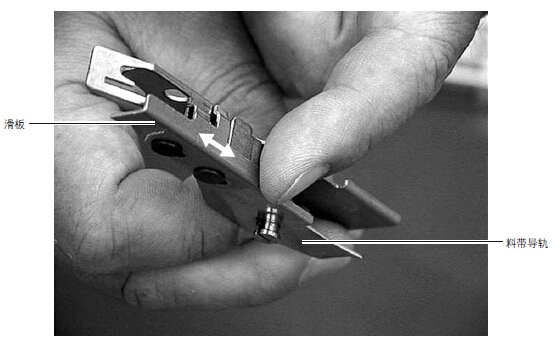
Step 2.
Please use a brush to clean up the garbage between the material belt guide rail and the plate.
Cleaning material tape guide rail (Fig.)
Step 3 Confirm the operation status of the component transmission port.
Confirm whether the component transmission port is operating correctly. In case of being clamped or sluggish, please replace the new belt guide rail in time.
Confirm operation status (Fig.)
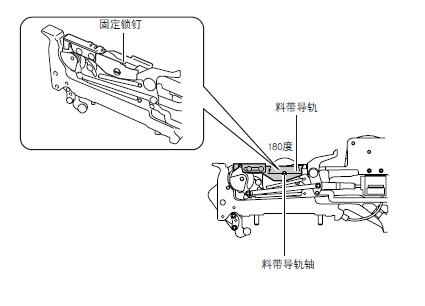
Step 4 Install the loading belt guide rail.
Install the strip guide rail and guide shaft on the plate in reverse order. Please turn the guide rail shaft 180 degrees anticlockwise with a slotted screwdriver
Stretch. Keep this state and tighten the fixing screws of the strip guide rail shaft. Then, please confirm that there is no gap between the strip guide rail and the plate.
Install the loading tape guide rail (Fig.)
Yamaha bonder feeder routine inspection and maintenance is introduced.
This article is a Yamaha bonder feeder CL model 8x4mm feeder to do the example, need Yamaha bonder feeder friends can contact me:.
Yamaha chip machine pneumatic feeder,yamaha cl model feeder
Yamaha chip machine YV100 series YG series pneumatic feeder YAMAHA 8MM FEEDER
Yamaha chip machine YV100 series YG series pneumatic feeder YAMAHA 12MM FEEDER
Yamaha Bonder YV100 Series YG Series Pneumatic Fiducial YAMAHA 16MM FEEDER
Yamaha Bonder YV100 Series YG Series Pneumatic Fiducial YAMAHA 24MM FEEDER
Yamaha Chip Machine YV100 Series YG Series Pneumatic Fiducial YAMAHA 32MM FEEDER
Yamaha Chip Machine YV100 Series YG Series Pneumatic Fiducial YAMAHA 44MM FEEDER
Yamaha YV100 series YG series pneumatic flyer YAMAHA 56MM FEEDER
Yamaha CL model 8*2mm pneumatic flyer, applicable models: YAMAHA YVL88II YV100II YVL112-2; YV88X YV88XG YV100X YV100Xe YV100Xg YV100XP YG100A YG100B YG200 YG300 models;
Yamaha CL model 8*4mm pneumatic flyer for YAMAHA YVL88II YV100II YVL112-2; YV88X YV88XG YV100X YV100Xe YV100Xg YV100XP YG100A YG100B YG200 YG300 models;
Yamaha CL model 12mm pneumatic flyer for YAMAHA YVL88II YV100II YVL112-2; YV88X YV88XG YV100X YV100Xe YV100Xg YV100XP YG100A YG100B YG200 YG300 models;
YAMAHA CL model 16mm pneumatic flyer for YAMAHA YAMAHA CL model 24mm pneumatic flyer for YAMAHA YAMAHA CL Model 32mm Pneumatic Fiducial, for YAMAHA YAMAHA CL model 44mm pneumatic flybar, applicable models: YAMAHA YAMAHA CL model 56mm pneumatic flyer, applicable models: YAMAHA
Translated with www.DeepL.com/Translator (free version)
- Categories:Industry News
- Author:Becky Su
- Origin:
- Time of issue:2022-11-30 11:08
- Views:
Information
Routine spot check and maintenance of Yamaha SMT feeder
Purpose: In order to use the belt feeder for a long time, it must be checked and maintained regularly.
1 Daily spot check
Before using the belt feeder, please check the following items.
Routine Check Items:
| Symptom | Countermeasure |
| Whether the fixing rod is loose | Please refer to the maintenance manual |
| Whether the material belt guide rail is loose | Refer to Cleaning of Material Belt Guideway |
| Whether the screws are loose | Please tighten the screws |
| Whether there are deformed and damaged elements | Repair, replace |
| Whether any components are missing | Repair, replace |
2 Cleaning of belt guide rail
If garbage such as electronic components falls into the gap between the material belt guide rail and the plate, it will cause the material belt guide rail to become loose, the element conveying port will be deformed, and the element adsorption position will shift. In case of similar phenomenon, please follow the following steps to clean.
Step 1 Remove the strip guide rail.
Please loosen the screw fixing the upper belt guide rail shaft and remove the belt guide rail and guide rail shaft. Please use a screwdriver to turn the material belt guide rail shaft to facilitate disassembly.
Remove the tape guide rail (Fig.)
Step 2.
Please use a brush to clean up the garbage between the material belt guide rail and the plate.
Cleaning material tape guide rail (Fig.)

Step 3 Confirm the operation status of the component transmission port.
Confirm whether the component transmission port is operating correctly. In case of being clamped or sluggish, please replace the new belt guide rail in time.
Confirm operation status (Fig.)
Step 4 Install the loading belt guide rail.
Install the strip guide rail and guide shaft on the plate in reverse order. Please turn the guide rail shaft 180 degrees anticlockwise with a slotted screwdriver
Stretch. Keep this state and tighten the fixing screws of the strip guide rail shaft. Then, please confirm that there is no gap between the strip guide rail and the plate.
Install the loading tape guide rail (Fig.)
Yamaha bonder feeder routine inspection and maintenance is introduced.
This article is a Yamaha bonder feeder CL model 8x4mm feeder to do the example, need Yamaha bonder feeder friends can contact me:becky@hysmt.cn.
Yamaha chip machine pneumatic feeder,yamaha cl model feeder
Yamaha chip machine YV100 series YG series pneumatic feeder YAMAHA 8MM FEEDER
Yamaha chip machine YV100 series YG series pneumatic feeder YAMAHA 12MM FEEDER
Yamaha Bonder YV100 Series YG Series Pneumatic Fiducial YAMAHA 16MM FEEDER
Yamaha Bonder YV100 Series YG Series Pneumatic Fiducial YAMAHA 24MM FEEDER
Yamaha Chip Machine YV100 Series YG Series Pneumatic Fiducial YAMAHA 32MM FEEDER
Yamaha Chip Machine YV100 Series YG Series Pneumatic Fiducial YAMAHA 44MM FEEDER
Yamaha YV100 series YG series pneumatic flyer YAMAHA 56MM FEEDER
Yamaha CL model 8*2mm pneumatic flyer, applicable models: YAMAHA YVL88II YV100II YVL112-2; YV88X YV88XG YV100X YV100Xe YV100Xg YV100XP YG100A YG100B YG200 YG300 models;
Yamaha CL model 8*4mm pneumatic flyer for YAMAHA YVL88II YV100II YVL112-2; YV88X YV88XG YV100X YV100Xe YV100Xg YV100XP YG100A YG100B YG200 YG300 models;
Yamaha CL model 12mm pneumatic flyer for YAMAHA YVL88II YV100II YVL112-2; YV88X YV88XG YV100X YV100Xe YV100Xg YV100XP YG100A YG100B YG200 YG300 models;
YAMAHA CL model 16mm pneumatic flyer for YAMAHA YAMAHA CL model 24mm pneumatic flyer for YAMAHA YAMAHA CL Model 32mm Pneumatic Fiducial, for YAMAHA YAMAHA CL model 44mm pneumatic flybar, applicable models: YAMAHA YAMAHA CL model 56mm pneumatic flyer, applicable models: YAMAHA
Translated with www.DeepL.com/Translator (free version)
Keyword:
Related News


PRODUCTS
CONTACT US
Hotline:(0086)755-27801389
Mobile: (0086)15323874439
Sale No.1: becky@hysmt.cn
Sale No.2: fhysmt@hysmt.cn
Sale No.3: zksale@hysmt.cn
Sale No.4: sale@hysmt.cn
Sale No.5: elsey@hysmt.cn
GIVE ME A MESSAGE
Copyright: ZK Electronic Technology Co., Ltd 粤ICP备11054297号 Powered by www.300.cn